

Sunday, January 27, 2008
Taking it in
Most of this project is being sourced through Ebay. The latest aquisition is a single carb intake manifold. The piece and shipping cost 23 bucks, an average going price. It arrived half polished with good studs. I need to polish the rest of it before it goes on the bike. The first thing I did was to port it. I have chosen to use a single as opposed to duals for cost and simplicity. The port job may seem to be a conflict of interest, but I want to get the most of it. All who have built engines know that airflow is everything. Now I have something to stay busy with until more funds free up and more parts are in hand.
Wednesday, January 2, 2008
Shiny Alu-mini-um
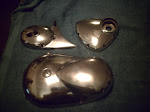
I have called it tin but there is a difference. Tin is generally a term used for the sheetmetal. Fenders, tanks, electrical boxes and side covers. Chassis parts. Engine covers are made of alu-mini-um. Say it like the English as it is an English bike. I have invested about 20 hours into polishing the rocker boxes. Hand finished by file and sandpaper. I left a few imperfections on purpose, a 40 year old chopper should not be perfect. Leave the surcigially sterile bikes to the posers who can afford 50 grand for one.
The engine side covers were relatively easy to clean and resore a nice finish. The rocker boxes required some time and greater effort due to one mistake. A Dremel Tool shoud carry the same warning as a hammer. If it did not go together with a hammer, don't take it apart with one. One removed, I foolishly loaded a sanding disc on the grinder and went to town removing the years of corrosion. I added quite a few low spots and nicks the took considerable effort to remove. One step foward and two steps back.
Step one. File down the obvious blemishes and blend the surface
Step two. 180 Grit wet sand the file marks
Step three. 240 grit until the 180 scratches vanish
Step four. 400 grit and see all the spots that were missed now that the surface is mostly uniform
Step Five. Go back to the files and start over.
Steps 6-10. Repeat 1-5
Step 11. 600 under a dribbling faucet until the grey filings cease.
Steps 12-14. 800 1000 1200, each time the filings become finer and the scratches become smaller. The metal lightenes in colour with each step.
Step 15. Cr1 Rouge on the buffing wheel. Now I have paid enough pennance and get to use power tools again.
Step 16. Change wheels on the bench grinder and switch to a jewelers rouge for a near final polish.
Step 17. Wipe it down thouroughly and apply a polish/sealer.
For those who seek a mirror shine or a chrome like finish, wet sand with a 1500 and 2000 before using a buffing wheel. Not for me. I prefer some petina and the character it brings.
Subscribe to:
Posts (Atom)